
How To Build a Free Academic Website
with Jekyll and GitHub pages!
Acknowledgements
I only knew how to get started with Jekyll because of Anne Draelos’s excellent workshop through the Duke NeuroMethods club. What you’ll see below is the kind of guide I wish I had when I sat down to implement what I learned from Anne’s workshop. This method for website building is definitely easier if you already have some experience with programming, but I’ve included enough resources so that someone without any background can get themselves the requisite skills needed to make their own site.
Table of contents
- Why do I need a website?
- What are the different ways I can make one?
- Software & programming knowledge you’ll need
- Internet knowledge that’s helpful to know
- How to initialize your site
- How to customize your site
- I’m super proficient with git/Hub, markdown, and command line. What’s the TLD;DR?
- FAQ
Why do I need a website?
A personal website is one of the most valuable tools you can have in your arsenal as an early-career researcher. It’s basically a live CV that anyone can access anytime, and theoretically can increase the reach of your scholarship. In addition to being a central hub for all things “you” (research interests, background, publications, code), it’s also a place where you can creatively share things that make you unique. Some examples of this include science outreach efforts, art that you make, coffee that you brew, or even just your thoughts expressed in the form of a blogpost. But no worries if you don’t have any of these additional things—just a simple site with your name, photo, and CV will make you seem like a more legit, polished, serious researcher, making you stand out from the crowd of other applicants applying to that dream position of yours.
Ok, fine. How do I make one?
Like most things in science (and life), website-builders are subject to the Engineering Project Triangle:
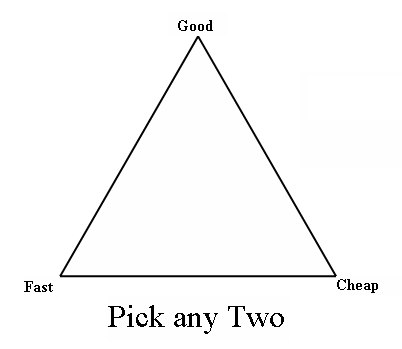
(for present purposes, “fast” can be interchangeable with “easy”)
This post is dedicated to the “cheap” and “good” line segment. I’ll be showing you how to build & host a site completely for free using Jekyll and GitHub pages. It’s definitely not the easiest or fastest way to build a site, but it is unquestionably the cheapest and gives you a beautiful site that isn’t cluttered with ads or banners. You also pick up a bunch of skills along the way, which I think is a plus :)
If I had to pick one website platform that basically encompasses all dimensions of the triangle, it would be Wix. This is a totally GUI-based website-builder, and there is the option of hosting it for free. However, you have to compromise by having a banner on the top of the site saying that this is a free site hosted by Wix. If that’s not an issue for you and you want to quickly build a beautiful website, then I can’t recommend Wix highly enough. I used it to build imclab.org and an early version of wzbc.org (which only slightly resembles how the site looks now).
If you want the combination of “fast” and “good”, then you could either upgrade to a paid Wix plan or use Squarespace. Another site I manage, ssnap.net, was built on Squarespace and it’s a beauty. We paid ~$200 to launch it, pay $20 annually for the domain, and $8 monthly for hosting. But that’s a business site, so the prices might be different for personal sites. I personally find Wix more flexible and intuitive to use, but I know others who prefer Squarespace. So if cost is not an issue for you, play around with both to see what’s best for your needs!
Vibe check!
Are you familiar with git, GitHub, command line, Ruby, Jekyll, and working with plain text/Markdowns? Sweet! Building the site will be a breeze. If you’re also familiar with hosting, domain names, and SEO, then skip right ahead to the section Let’s build this thing!. If you’re familiar with most of these concepts, then click on the name of the few you’re not too familiar with before jumping to Let’s build this thing!.
If you don’t have experience with most/any of these things, then you are the target audience of this piece :) Read on and you’ll learn all you need to know in order to build a free personal website!
Basics: software & programming
The biggest obstacle to getting your Jekyll site off the ground quickly is all the background knowledge & skills you need. I’ve tried to strike the balance of comprehensiveness and brevity here, and am approaching this from the perspective of someone who has never programmed before. Regardless of your existing skill level, Google/the internet is absolutely going to be your best friend as you troubleshoot problems that will inevitably come up.
GitHub account
The first thing you need to host a site on GitHub pages is a GitHub account. GitHub is an online platform for hosting and sharing code. It’s totally free, and it allows you to collaborate effortlessly with other people on a project, keep track of changes in your own scripts, and/or borrow someone else’s code who’s already done something you want to do. The basic “unit” of GitHub is the “repository” (or “repo”), which is basically just a folder that holds all the data & code related to a particular project. Here’s an example of one of my repos, and here’s my lab’s GitHub account that hosts a bunch of different repos.
Git
The real workhorse of GitHub is git. Git is a really fantastic piece of software that allows you to exert version control over your text-based files (e.g., markdowns, scripts, etc). Basically, you create save-points (formally called “commits”) that you can always return to, no matter what changes you make to your files or even to the whole repository. This means that you can get experimental with code without having to save multiple versions of the same script (v1, v2, etc.). Kevin has made an excellent tutorial on using Git, and several more exist on the internet. Git is a highly valuable tool not just for your own project management, but also as a skill to list on a CV. I can’t recommend learning it highly enough!
Command line / shell
There are a number of GUI-based methods for using Git, but I think the easiest, most reliable, and most straightforward method is to use it in the command line. I used to be terrified by it, but it’s really not so scary and we’ll only need some simple commands for website-building anyway. This article does a great job explaining why researchers should embrace the command line. But if you’re looking for a more general introduction to what the heck the command line even is, I highly recommend this page.
For me, the most intimidating part of starting to use the command line was not knowing where the heck in computer-space I was. This page would have saved me a lot of head-banging back in the day, and if you only click on one external link in this whole post it should be that one. Here’s an overview of the different commands that you’ll need to use while building your website:
pwd: short for “present working directory”. this will tell you where you are in computer-space.cd: short for “change directory”. this is how you change locations in computer-space. it’s functionally equivalent to clicking on a folder.ls: short for “listing”. this will display all the files in the directory you’re in. it’s what you see when you open a folder using the mouse...: this is a shortcut for moving up one directory. e.g., if you’re in a directory that’s in your Desktop (Desktop/folder_name),cd ..will take you out offolder_nameand back into the Desktop. likewise if you’re inDesktop/folder_name/subfolder,cd ..will take your fromsubfoldertofolder_name.- the tab key: there’s this thing called “tab-completion”, which is a great shortcut to know. it’s essentially like predictive text on your phone.. as you’re typing the name of a directory, you can hit the tab key once you’ve entered enough characters to uniquely identify the directory and the shell will complete the text for you. e.g., if the only folder that starts with the letter
fon your Desktop is calledfolder_name, then all you need to type iscd fand then hit the tab key. the shell will complete the rest of the directory name (folder_name) for you.
There are a handful more git-specific commands that you’ll need to use, but I will cover those later on. I highly recommend spending some time playing around with different commands in the command line, with the GUI-version of the folder navigation (e.g., Finder in Mac) open alongside you. It will really help boost your confidence and get you more comfortable using your computer in this powerful and direct way.
Jekyll & Ruby
The cherries (pun intended) on top. Ruby is the programming language that Jekyll is written in. Just like R and Python have different packages you can download, Jekyll is a package (or “gem”) that you use in a Ruby programming environment. Jekyll uses Ruby to compile all your individual text files into a website. So it goes without saying that if you’re going to use Jekyll to build your free academic website, you will need to install Ruby. But that’s pretty much all you need to do with Ruby – just install it and let Jekyll do its thing. The only other time I’ve had to mess with anything Ruby-related was to update the Gemfile of a repo… this is just a list of gems/packages (i.e., plugins that increase Jekyll’s functionality) that are used to compile your site.
After you’ve installed Ruby, you then need to install Jekyll. This is the same link as the one above for installing Ruby, and that’s because it tells you how to install both on any operating system you might be using. Pretty similarly to Ruby, there’s very little you will need to do with Jekyll. You might want to install some plugins to customize your site, but other than that all you’ll ever do with Jekyll specifically is run one command to test changes locally before you publish them on the internet.
Plain text
The last piece of the puzzle is the plain text files that will serve as the content of your site. You’re going to use Markdowns (or .md files) to make the plain text files look pretty. Markdown has pretty straightforward syntax, allows for incredibly easy version control of text documents, and is very versatile (e.g., RMarkdowns allow you to make beautiful documents that display & execute R code). Since the sites are hosted on GitHub pages, you’ll want to make sure you’re using GitHub-flavored markdown syntax. It’s really similar to generic markdown syntax, but with some minor tweaks here and there. I don’t know why GitHub has it’s own “flavor” of markdown, but you can find a guide to it here.
There are a number of different ways one can edit a plain text file. The default on Mac is this program called TextEdit, which is probably what you’ve seen if you’ve ever tried to open a .txt on a Mac. If you have RStudio on your computer, your .md files will probably open with that (or at least that was the default on my computer). I’ve recently converted to Atom for writing markdowns, and I haven’t looked back. All of the flexibility and potential for customization was super daunting to me at first, but after I just spent a little bit working through it it got way less intimidating. The one thing I super duper advise against is using the built-in git/GitHub functionality. It severely screwed with an early version of my website, and led to me basically having to build the whole thing over again. I think was a theme-specific issue, but better to be safe than sorry (trust me, lol).
Basics: internet concepts
Something that was really confusing to me when I built my first website was the difference between hosting and a domain, so I thought it would be worth briefly explaining these and some other web-related concepts.
domains & hosting
The domain of a website is also called its URL – it’s what you type into browsers when you want to navigate to a particular site (e.g., google.com is a domain). GitHub pages websites can only have the domain name github-username.github.io. This is a perfectly fine domain name, and in fact I’m usually impressed when I see that someone has a .github.io domain because it means that they’re pretty good programmers. But what if you don’t like your GitHub username, or you find the default domain clunky? This is a case where you have to buy a domain.
Like everything that can be bought, there is a market for domain names and some can be quite expensive. For example, I don’t think anyone’s going to be buying the google.com domain anytime soon. The domain market is also chock full of different providers/companies that you can buy domains from. I bought the domains mariakhoudary.com and mariakhoudary.me (which I haven’t activated yet) from NameCheap. Based on a brief bit of research (mainly just watching a video like this), it seemed like the best bang for my buck and I’ve been happy with it. I think I paid like $7 to own mariakhoudary.com for a year. And by “own”, I mean I can choose which website that domain name directs to. But of course if you want to keep your website totally free, you can just make sure to pick a GitHub username that you like and use the default domain.
Websites have to be hosted somewhere in order for people other than you to access them. Someone with better technical knowledge than me can definitely give a better description, but I understand hosting basically as a remote computer where your website’s information lives. It’s like when you put stuff on Google Drive or iCloud (or GitHub) – it’s a big, powerful computer that has files you can access from anywhere. And because this takes more physical resources than a domain, it’s usually where the big cost comes in for website building. Usually you have to pay some monthly hosting fee, and these can vary widely based on a lot of different factors. But it would be hard to find a price lower than $7-10 a month, I think.
static vs. dynamic sites
This brings us to the difference between static and dynamic websites. I think the reason GitHub pages can get away with free hosting is because it’s only compatible with static sites. But I could be totally wrong. Simply put, the difference between a static and dynamic site is how the content is generated when someone visits your site. If your site is static (like all Jekyll sites), then people are just pulling up different .html files when they open different pages of your site (by accessing them on the server that’s hosting the site). This can be a pain in the butt if you’re building your site totally from scratch, as it takes a lot of work to get a consistent theme across pages (you’d have to hard code the theme into each .html file). But Jekyll makes it much easier by having pre-existing themes that you can use, and you’ll only have to tweak a few things to transform a generic template into your own personal site. Dynamic sites generate the content every time someone navigates to your site, and that makes things a little less labor-intensive on your end.
SEO
SEO, or search engine optimization, is another important concept. Basically, this just means that your site plays well with search engines. By this I mean that your site is the first thing that comes up when someone searches your name, it populates with a little description of your site underneath the url, specific content on the site can be found through search, etc. The jekyll-seo-tag and jekyll-sitemap gems make SEO optimization super easy, and I recommend that everyone add them to their site’s Gemfile.
Let’s build this thing!
Now that we’ve covered the fundamentals, let’s dive into the real reason we’re all here: to build a beautiful, free, personal website.
Pick a theme
For me, this felt like the most daunting part. There are hundreds of beautiful Jekyll themes all floating around the internet, and while this variety is great, it can also be paralyzing for a perfectionist who doesn’t like wasting time. I liked that this site allowed me to filter for things I wanted, but you can also find themes here, here, and here (master list right from the source).
You’ll see that Jekyll themes are just GitHub repos. Isn’t that neat?! If it doesn’t seem neat to you now, hopefully it will shortly. My biggest recommendation is that, in addition to aesthetics, pick a theme that has good documentation. By this I mean a theme that has a juicy README (the landing page of a repo), preferably with instructions on how to use the theme, links to FAQs, etc. Popular themes are usually popular for a reason – they look nice and they’re easy to use, and they have the added benefit of an increased likelihood of good documentation. So there’s no shame in picking a popular theme – you can always customize it as you learn more about the Jekyll ecosystem, and you’ll likely have more resources for learning/customization if you use a theme that many others have used as well.
Fork & clone it
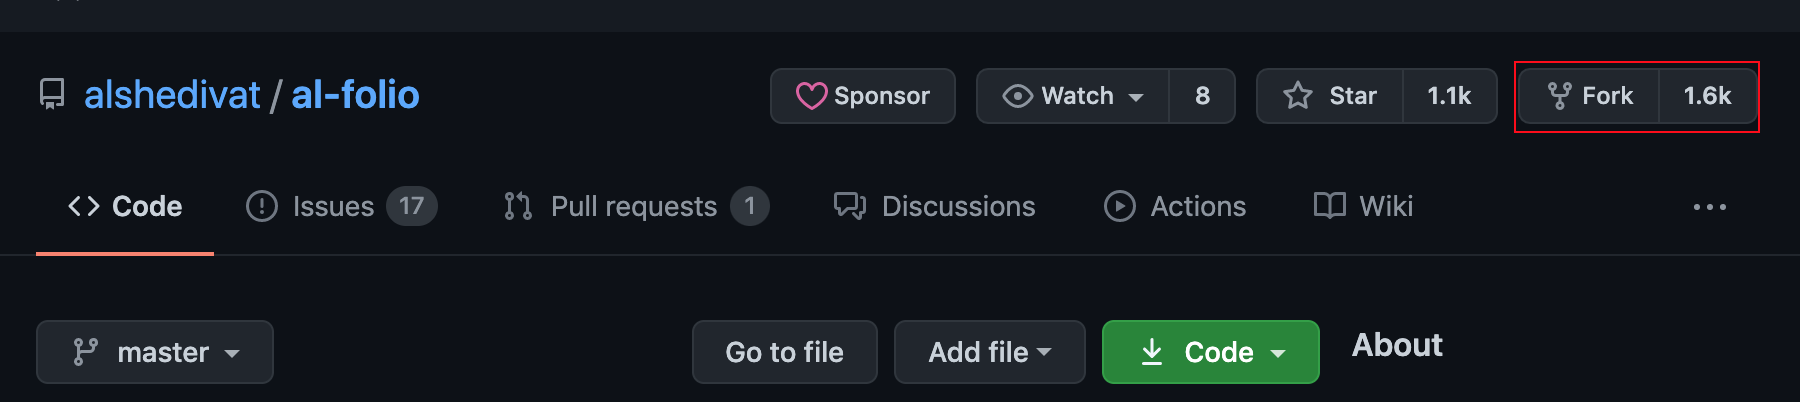
Once you choose a theme, the first thing you need to do is fork it. This takes the existing repository, all its files, structure, and media, and creates a copy (on GitHub) that is linked to your account. Forking the repo allows you to take the template/theme and input your own information.
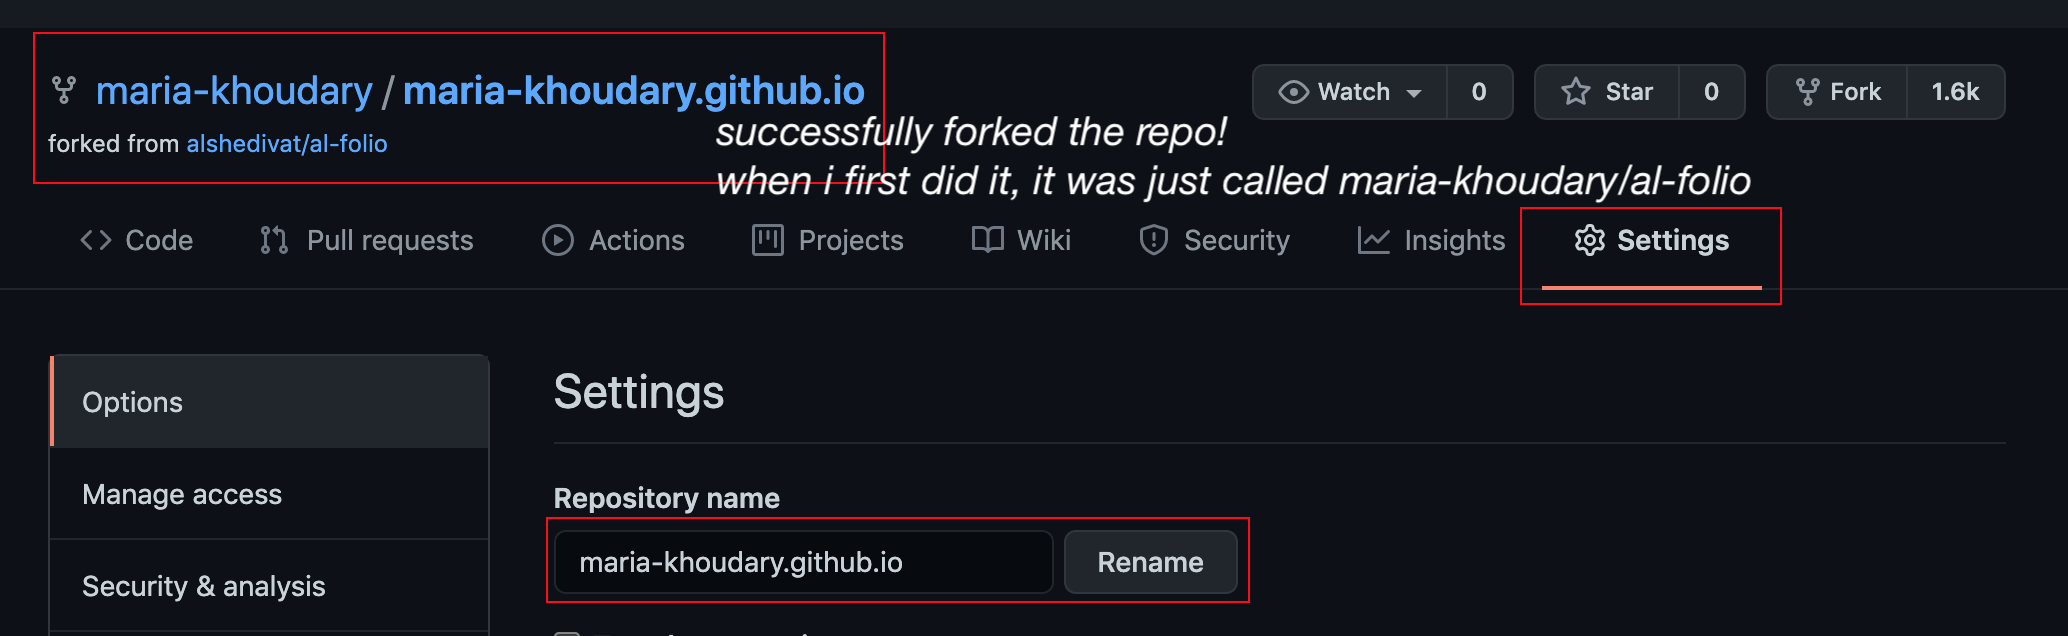
Once you have a copy of the theme that’s linked to your user, it will show up when you navigate to your profile/your repositories. But it will still be named the name of the theme (e.g., Minimal Mistakes). Now you need to rename it to be username.github.io. To do this, navigate to your repositories, click on the repo you just forked, click on the Settings tab all the way to the right, and then simply type in <username>.github.io (of course swapping in your actual username with <username>), and then click Rename.
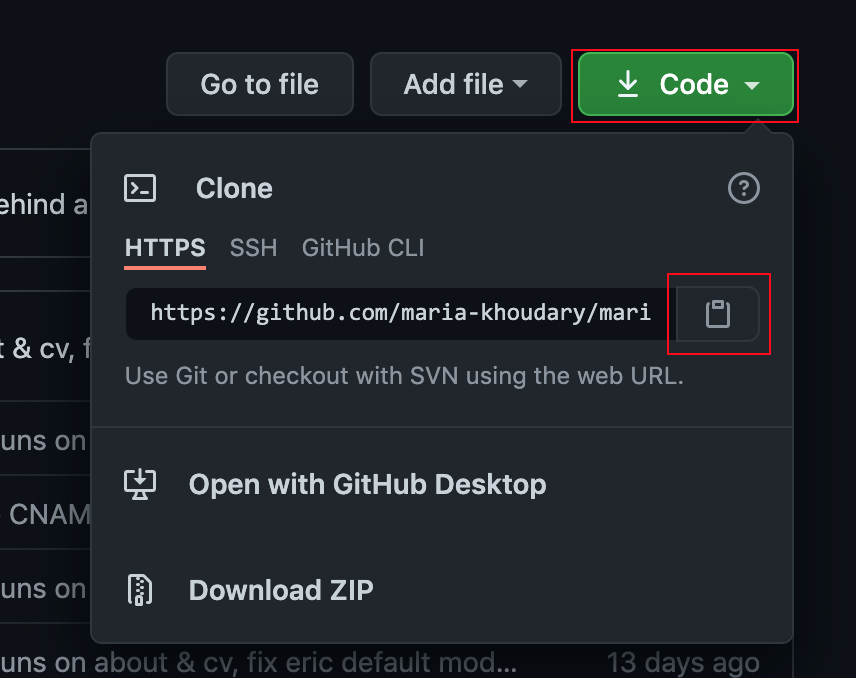
Now you’re ready to clone it: download the repo from GitHub onto your computer. This is how you’ll be able to make & test changes. To clone, click on the green Code button at the top of the repo and then click on the little clipboard to copy the path of the repo. As you can see, cloning is functionally equivalent to downloading the repo. On the same dropdown, you could perform the exact same function by physically downloading the repo as a folder and then manually placing it where you want on your computer. But I recommend following the git clone method.
Once you’ve copied the path to the repo, open up a shell (the Terminal app if you’re on Mac).
- if you don’t know where on your computer you are, type
pwdto get a printout of the path - using
cd, navigate into the directory where you want to store the repo. If you want to store it on your Desktop, simply typecd Desktopand hit enter - if you want to confirm you’re on the Desktop, type
lsand then hit enter. You’ll see a printout of all the files on your Desktop, confirming that you’ve navigated to the correct location. - type
git clone <pasted repo path>and then hit enter. and voila! you’ll now see a folder calledusername.github.io
Edit, preview, commit & push
The next thing you’ll want to do is make some changes. I describe the basics of Jekyll file structure in greater detail below. But for purposes of illustration, open the file _config.yml and input some of your personal information into the fields.
But how can you be sure that your changes look the way you want them to? This is where the one Jekyll command you’ll use comes in.
- navigate into the repo using the shell:
cd path/to/repoand enter - optional: confirm you’re in the right directory with
lsand enter - if it’s your very first time opening/modifying something in the repo, you probably have to run
bundle installfirst. this installs files for all the gems (packages) that your theme uses to build the site. - type
bundle exec jekyll serveinto the shell and hit enter. - copy the URL of the local server (highlighted by the red square), paste it into your web browser, and preview your changes!

What you’ve just done is create a local server, which basically means host the website locally. By “locally”, I mean that all changes to the site will only be viewable from the device that you’re on and with the URL (or more formally, “port”) that was printed out in response to the bundle exec jekyll serve call. This is how you’ll develop your website! I tend to make a bunch of changes and use the local server to see how they’re gonna look on my site. Then I’ll only push them once they’re satisfactory, so that what appears is a polished version of edits.
Any .txt or .md files that you edit while the server is running will be immediately observable on the page, as long as you save the changes and then refresh the page. The _config file is different, though. Since it contains all the commands that render your text files into HTML, you will need to restart the server to see what happens when you change things in the _config file. So if you’re currently running a local server and want to see what happens when you change some lines in _config.yml, you will need to type ctrl + c (on Mac, might be different on Windows) to close out the server. The specific command should populate right at the bottom of the server printout. Once you close out the server, just type bundle exec jekyll serve + enter again to see how the changes to the _config file render.
Once you’ve made progress to a good stopping point, the next thing you need to do is commit your changes.
- if you’re running a server, close it out
- from inside your website directory type the command
git status– this will tell you which files have been changed - identify the files that you’ve changed & whose changes you want to keep
- type
git addand then type the paths of the files you just identified. if there are multiple, just separate them with a space or use multiplegit addcalls - type
git statusagain to verify that all the files whose changes you want to keep have been staged for commit (they print out in green instead of red) - type
git commit -mand add a short message explaining what the changes do. for example,git commit -m "update config with personal info". the quotes around the commit message are imperative, and you can’t commit without a message.
Once you hit enter after your git commit command, then you’ll have created your first commit! This is now a savepoint for your directory, and if you do something catastrophic down the line, you can always “go back in time” to how the repo was configured at the time of this commit (see Kevin’s post for more details). I recommend making commits relatively frequently, at changepoints that make sense to you. And be as descriptive as you can with the message. A good rule of thumb as to whether you’ve done too much in between commits is if you can’t fit all the changes into the commit message. Then I recommend splitting that huge batch of changes into smaller commits so that coming back to them (if you need to) is easier.
After you’ve made a bunch of commits and have gotten the site to a place where you feel comfortable making it public on the internet, the last step is to push your changes. This pushes (for lack of a better word) all of your local changes, stored as commits, to the GitHub repo that’s hosted remotely. By pushing your changes, you create the publicly accessible website. (ok, the site actually becomes publicly accessible as soon as you rename the repo to username.github.io. if you absolutely don’t want anything on the internet to show up when someone types username.github.io into their browser, then clone the repo with its default name, make all the changes, change the name of the local copy to username.github.io, rename your repo on GitHub the same, and then push your changes. this way the public site will immediately have all of your information).
Jekyll architecture
Periodic reminder that Jekyll is a static site generator. This means that it takes your plain text files, transforms them to html, and then knits the whole thing together into a cohesive website. It basically allows you to get the best of both worlds of static and dynamic sites – it’s lightweight, doesn’t require a lot of server power, and by editing global html/formatting scripts, you don’t have to hard code all of your aesthetics into each html file.
There might be a more specific name for what I’m trying to get at here, but architecture is what made sense to me so that’s what I’ll call it. I’ll explain what the key pieces of each Jekyll theme are, and what modifying them would do. Every theme does things a little differently, but I believe these are the elements that are relatively the same across themes. This will only be the briefest of introductions, meant to orient you to the directory that you’re working in. We could probably do a whole other tutorial on in-depth site customization. But for today we’ll keep it breezy. Different elements are listed in order of likelihood you’ll need to edit them.
_config.yml
This is the workhorse of the Jekyll site. It’s where you’ll enter information about global variables, like your social links, contact info, etc. The config file is the first thing you’ll want to check, since it’s usually where the bulk of the “customization” happens. It’s meant to be user-friendly, and often you just need to swap out the info that’s currently in the config file with your own. Just make sure you keep the same syntax as what’s there currently, and you’ll be golden. Reminder that this is the one file that you’ll need to generate a new server to see the changes for. So if you’re changing the config file while running a server and are freaking out that you’re not seeing changes, that’s why (if that example seems oddly specific, it’s because it is).
_pages
This is usually the directory that stores the .md files that correspond to different pages on your site. These pages are what will populate your header. Common pages on an academic website include about, research, and (if you have them)publications. Other pages you might add are contact, blog, teaching, code. But the sky is the limit! Again, your website is a place where you can showcase all of the things that make you unique. For instance, I really love the intersection of art & science, so I have a media page where I showcase the work I’ve done to that end.
At a minimum, your site should have an about page that gives some background info on who you are and a research page that describes the stuff you work on. It would also be nice to have a page for your CV, whether you render it as a .md file or just upload a PDF. See the “things tweaked on mariakhoudary.com” portion of my website repo to see how I did that on the theme that my site uses.
_includes & _layouts
These are directories full of html files. _includes has html files that generate things like your header, footer, social icons, etc. It has the things that make your site look polished & professional. _layouts has html files that guide the rendering of your plain text. So this will control things like how specific pages look. These descriptions are deliberately vague, because again every theme will have slightly different organizational/architectural principles. The best thing for you to do is spend a few hours perusing the different directories and files therein to get a sense of what does what. But I know not everyone has the time/energy/patience/interest for that, and these two directories are ones you can completely ignore if you just want to stick to formatting that came with the template.
assets
This is a directory that stores things that spruce up the basic structure created by the html files in _includes and _layouts. It’s usually where you’ll store things like images for different pages, PDFs that you want to link to, and JavaScript and CSS code. You’re much more likely to modify the first two things I just listed than the last two things. I’ve never touched any of the JS or CSS scripts, but I’ve definitely added images and PDFs to things.
In principle, there’s no reason why your PDFs and images need to live in assets. Because you incorporate them into your site using relative paths within your directory, you can store this media pretty much anywhere. I like to just keep my stuff in assets because it keeps things tidy. I’ve even made sub-folders within assets for the different pages on my research page because I found it easier to keep track of things that way.
_posts
If your theme has a blog component, this is the directory where you’ll store blogposts. To make a new post, simply create a new .md file in the _posts directory, make sure it has the right header structure (more on that below), and start typing away.
_sass
This is another folder that you can totally ignore if you can’t be fussed with low-level aesthetic things. But if you’re picky about things like fonts & colors (like me), this is the directory where you’ll modify those kinds of things. Sass is a CSS extension that allows you to make things ~beautiful~. You’ll need to do some research/careful studying of extant syntax to figure out how to make the changes you want, so that’s why I consider modification to this directory to be an intermediately advanced customization step that is totally and completely optional.
_source
This is one I highly advise not messing with. Its function can differ based on the theme, and some themes don’t even have this in the directory because it actually serves as the local branch. So yeah I mainly included it here to tell you don’t modify anything in the _source directory.
Markdown headers
These aren’t actual files or directories, but they’re an essential part of making your website come to life. They are the very top bit of your Markdown files, usually bookended by three dashes on the top and bottom:
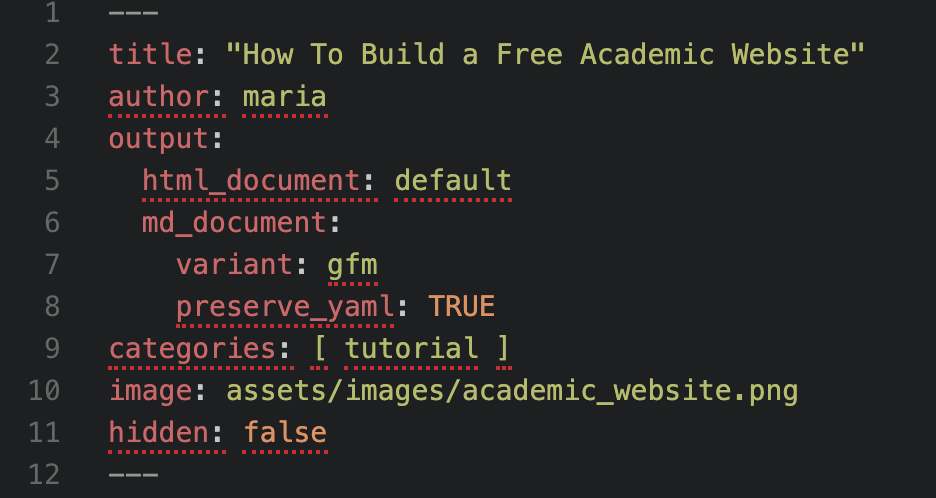
The variables (pictured above in red text) within a header are different for different pages of your theme, and are also different between different themes. To understand what the different variables in a header do, I recommend changing their values (pictured above in yellow text) one-by-one and observing the effects on your local server. Usually variables in the header correspond to more global things, like page order on the header, but they can also contain information about the image you’d like associated with the preview for the post (like in this example).
If you want to create additional pages that don’t currently exist in your theme, I recommend duplicating an existing page so that your preserve the header syntax. But the great thing about Jekyll themes is that they come basically premade for you to do this – if you really like the structure of one of your pages and want to make another page with different content that has the same layout, you just duplicate it and modify it. And if you just want to stick to the pages that your site came with, then all you need to do is update some of the info and you’ll be all set!
High-level overview
To make a free website using Jekyll and GitHub pages:
- Download Ruby and Jekyll if you don’t already have them
- Find a theme
- Fork it
- Rename it
username.github.io - Clone it
- Modify
_config.ymland the.mdfiles in_pages - Commit your changes
- Push your changes
- Voila!
FAQ
I want this to be a living document! Did you encounter challenges not anticipated by this post? Are you struggling to work through them right now? Feel free to be in touch and I’ll do my best to help. Otherwise, please send the problem (and solution, if you want) to me so that I can include it here! Again, this was just a cursory overview of how to get everything started. There are so many conversations to be had about best practices, optimization, customization, etc. Maybe I’ll do another post down the line describing the more advanced things you can do, but to be completely honest I’m still figuring things out myself :) You’ll see that my site isn’t perfect (hello, favicon.. does anyone know how to make it stable across pages?), but I love to learn and advance my skills. So hit me up if you know about things that I don’t know, or if you want to know more about the things that I do know!